This is the first iteration of a podcast using an AI version of my voice, but it still needs a little tweaking.
Backup your Mac Time machine with Ubuntu (networked) 2024
Hardware used in this setup:
- M1 Mac
- Ubuntu Server 22.04
Server Setup: This install is VERY EASY!
- Install ‘netatalk’ on the ubuntu machine.
sudo apt-get -y install netatalk
- Edit afp.conf
sudo nano /etc/netatalk/afp.conf- Add your location that you would like to store the backup on the Ubuntu server. (Ensuring it exists)

- Restart the netatalk service (Ubuntu Server):
sudo service netatalk restart
That was the server side, now onto the mac setup.
- In a terminal on the mac, run the following command:
- defaults write com.apple.systempreferences TMShowUnsupportedNetworkVolumes 1
- Then Reboot
- Mount share by selecting “Connect to server” from the Finder app’s “Go” menu (or press
⌘+K) and enter the machine name or IP address of your Ubuntu machineafp://192.168.1.100- This will use the ubuntu users credentials to authenticate
- Go to Time Machine preferences and select “Change location”, select to encrypt backup, and begin the backup process.
- The first backup takes a little longer, but after a few seconds you should be good to go!
How the Internet Died in 2016
I personally feel that this happens to coincide with the failing of most game development studios… A good AAA game is virtually impossible to find now… Combine this with the Pander-Verse and you get a complete loss of good / original content. Rather that be a movie, game, art, etc…
Remember, a LLM uses the averages of the responses it finds to create its responses. So, this will be generally(at current) a lack luster performance with fast moving fields.
Mac Devs – Pro Tip: Add Real Colors to bash.
If you have a new mac, and you are used to linux like me you probably are annoyed that all the colors in the shell are the same.
Of course, mac does have colors in the shell… However, they do not reflect if what you are looking at.
For Example, can you tell me from looking at the following which if a file, directory, and which is executable?

Where as once the script given below is ran it will look like the following:

Clearly you can see the file is white, the script is red because its executable, and the directories are a light blue. This can all be customized of course, but I find the defaults pretty good.
To Install these changes is quite easy, and I even made a script that can be ran without downloading. Simply run the following to make the changes and restart your terminal.
bash < <(curl -sSl https://gist.githubusercontent.com/MattCurryCom/6348692ffd9903d249907fb5212056d5/raw/080810de0caa9e0bdf70741104ab6bec1b2a8929/mac-linux-colors.sh)Please don’t take my word for what the script does, I highly recommend that you look at the script before if you don’t trust it. Just use the URL in the curl for reference. Its very simple.

ChatGPT and DevOps
Integrating ChatGPT within DevOps automation can streamline and enhance various aspects of your development and operations processes. Here are some ideas for utilizing ChatGPT in your DevOps workflows:
- Automated Troubleshooting and Diagnostics:
- Create a chatbot interface that developers and operations teams can use to diagnose and troubleshoot issues in real-time. ChatGPT can provide suggestions and solutions based on the symptoms and error messages provided.
- Incident Management and Response:
- Integrate ChatGPT into your incident management system to help with initial incident triage and resolution. It can provide relevant documentation, runbooks, and even suggest actions to take based on historical incident data.
- Release Notes Generation:
- Automatically generate release notes by summarizing the changes made in code commits and providing a human-readable format for communication between development and operations teams.
- Infrastructure Provisioning and Scaling:
- Use ChatGPT to create a conversational interface for provisioning and scaling infrastructure. Developers and operations teams can describe their requirements, and ChatGPT can generate the necessary infrastructure-as-code (IaC) scripts.
- ChatOps for Continuous Integration/Continuous Deployment (CI/CD):
- Enable ChatGPT to interact with your CI/CD pipeline. Developers can trigger builds and deployments, monitor progress, and receive notifications through a chat interface.
- Code Review Assistance:
- Improve the code review process by having ChatGPT provide automated code analysis and suggestions for improvements. It can assist in identifying potential issues, coding standards violations, and security vulnerabilities.
- Documentation Generation:
- Automatically generate documentation for new features, APIs, or infrastructure changes based on code comments, commit messages, and chat interactions with developers.
- ChatOps for ChatOps:
- Use ChatGPT to enhance your existing ChatOps workflows. It can help automate tasks within your ChatOps platform, making it easier to manage other aspects of your DevOps automation.
- Security and Compliance Checks:
- Integrate ChatGPT into your security and compliance automation processes. It can assist in scanning code for vulnerabilities, checking configurations for compliance, and recommending fixes.
- Natural Language Alerts and Notifications:
- Enable ChatGPT to provide natural language alerts and notifications for system events and monitoring data. This can make it easier for team members to understand and respond to critical incidents.
- Capacity Planning and Forecasting:
- Utilize ChatGPT to analyze historical data and make predictions for capacity planning, resource allocation, and scaling decisions.
- Onboarding and Training:
- Develop a chatbot-driven onboarding process for new team members, helping them get up to speed with your DevOps practices and tools.
- Chat-Based Reporting and Analytics:
- Allow team members to request reports and analytics on various aspects of your DevOps processes through a chat interface, making data-driven decisions more accessible.
Remember to carefully plan and secure the integration of ChatGPT into your DevOps automation, considering access controls, data privacy, and the potential impact of automation on your workflows. Additionally, continuously monitor and update the system to ensure it remains effective and aligned with your evolving DevOps needs.
T-Beam Communicator (Meshtastic)
The following are the build instructions for my T-Beam Based LoRa Communicator. No Phone Needed!
This allows for very long range communication without WiFi/cell communication. Up to 150KM+ line of sight. Also gives directions to each other via GPS (shows arrow pointing to the target user.) Additionally, It can also be connected via Bluetooth to a smart phone, for other features such as mapping via the Meshtastic App.
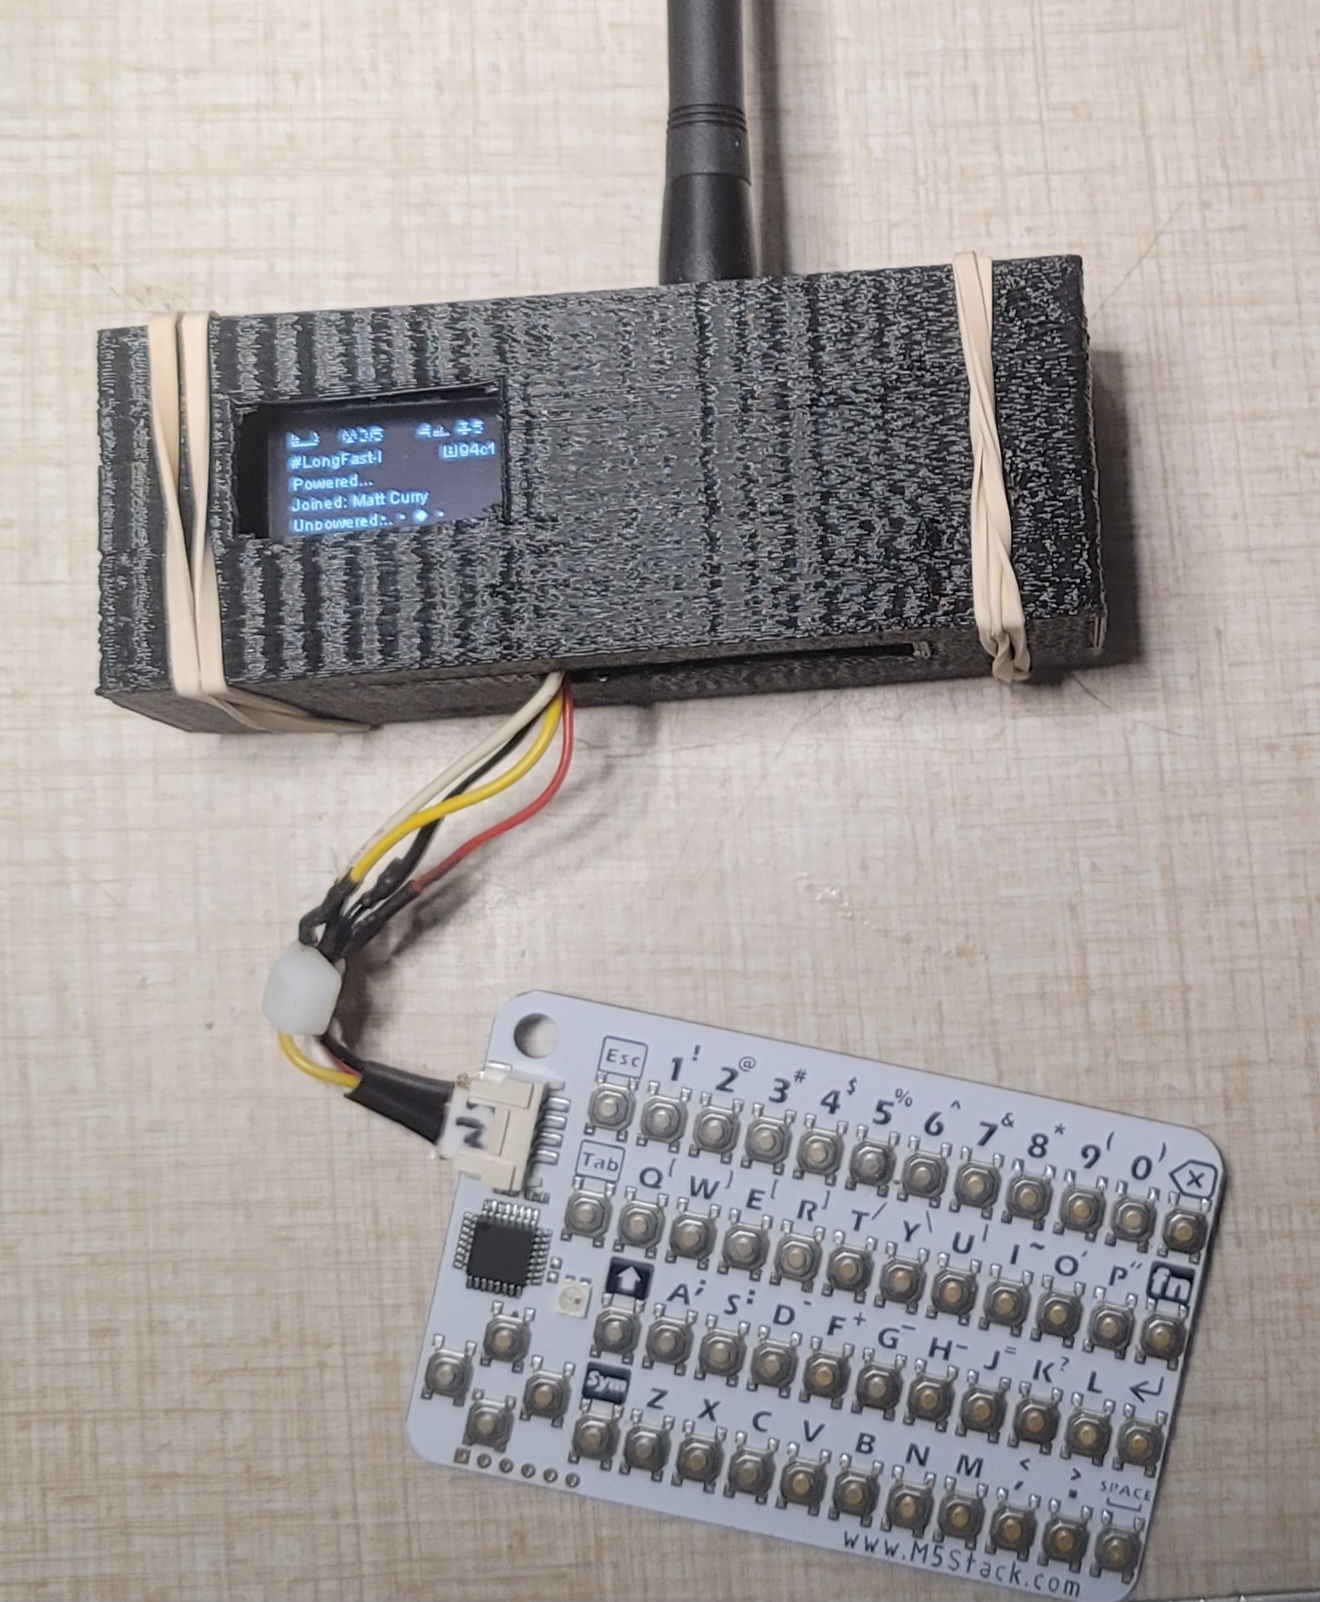
The following links are for US vendors of parts. I make no profit off anything listed. Also, please keep in mind if you want to pay less you can order from china and wait for it. I prefer to just get the items in a couple days in US.
Dependencies:
The t-beam will need to be flashed with the latest Meshtastic firmware, and the ‘Canned Message‘ module needs to be enabled.
The firmware can actually be flashed via a meshtastic web flasher now. Making it very easy. Once you have setup the device you will need to enable the ‘Canned Message‘ plugin. Reboot the device after setup, and plugins being enabled.
Parts :
Wiring the Keyboard:
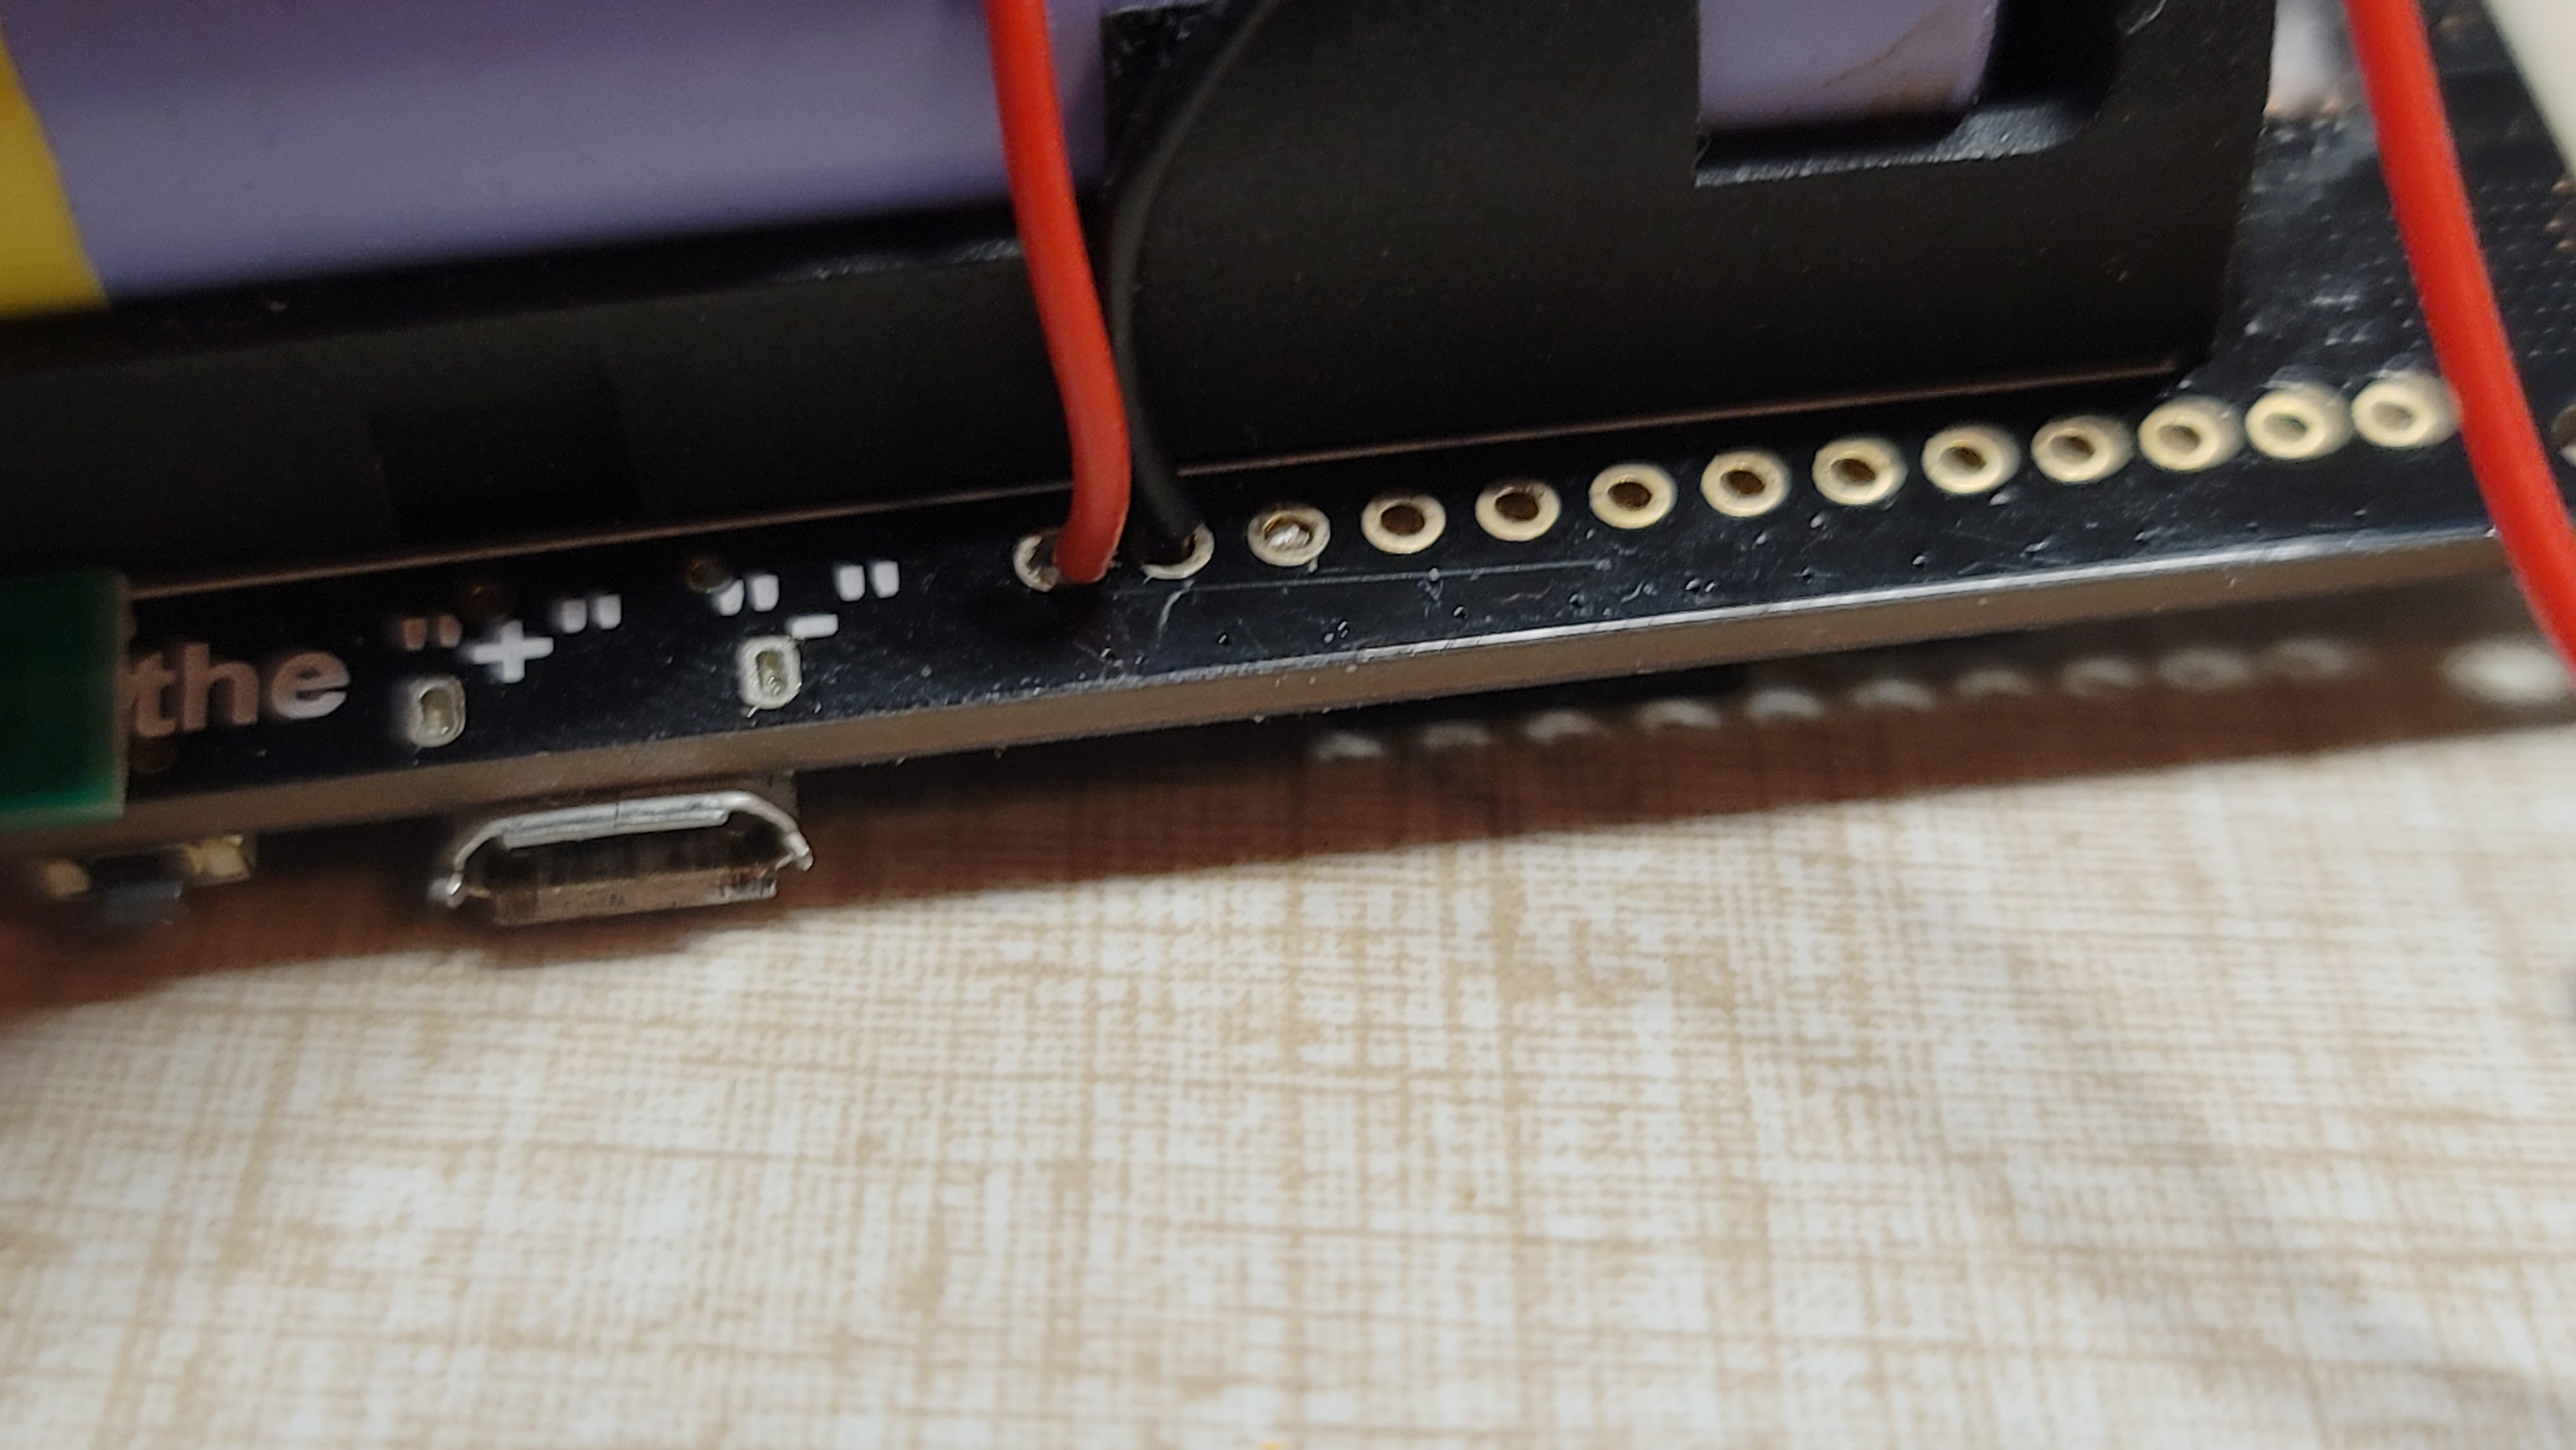
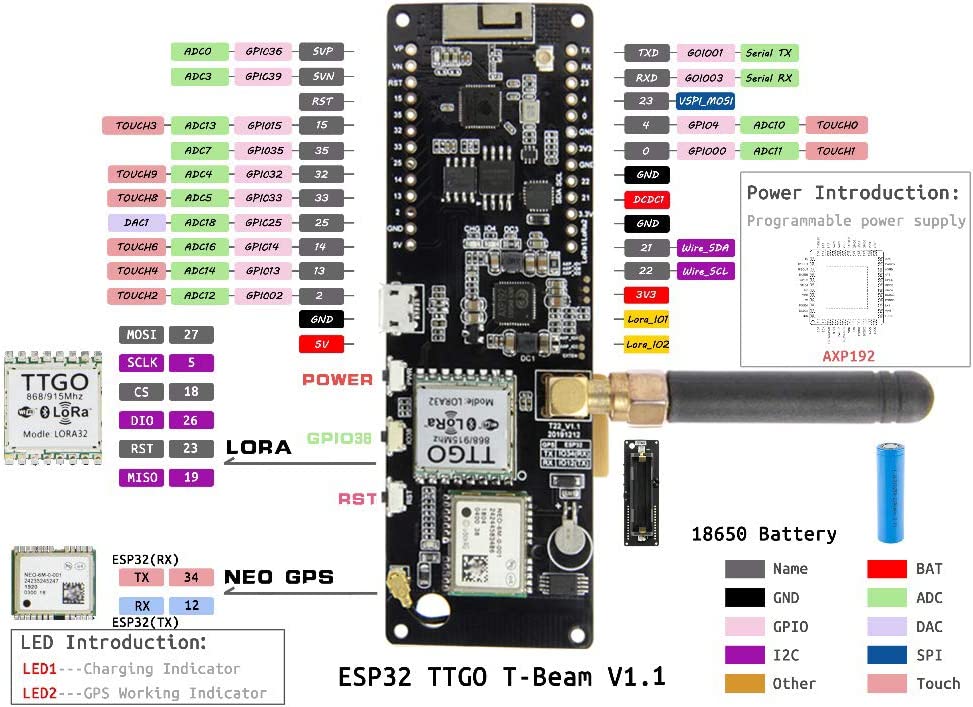
The CardKB will come with a grove cable. The red/black are power (5v), and the yellow and white are for signal.
- Yellow: Pin 22
- White: Pin 21



Lora + Meshtastic GPS Tracker

Tracking targets in the neighborhood with and without the internet! Cheap, and Easy!
LoRa (from “long range”) is a proprietary low-power wide-area network modulation technique.
In this project we will be using a mix of items to accomplish the goal at hand. That in no way means its the best way. In this case its more ease of setup, and use for the project at hand.

The software we will be using is call Meshtastic, this can be used for a few things; and can even be purchased pre-flashed on some LoRa devices.
Using Meshtastic, we can keep an eye on where our trackers are, and even send messages to them. Keep in mind that Meshtastic is usually used by an android phone as a means of communication when there is no internet or phone network. The LoRa device with Meshtastic communicates via Bluetooth with the android device. This allows for texting over LoRa via the application.
However, if the device has a GPS on it, it will also relay that information. Since these devices are ESP32 based they can go into a ‘deep sleep’ when not in use. This makes them very power friendly, and many of them run for days on a small battery.
In this example I am going to use the 2 different devices, one that I added a GPS added to manually.
Hardware Used
Heltec Wifi LoRa v2 + BN-880 GPS
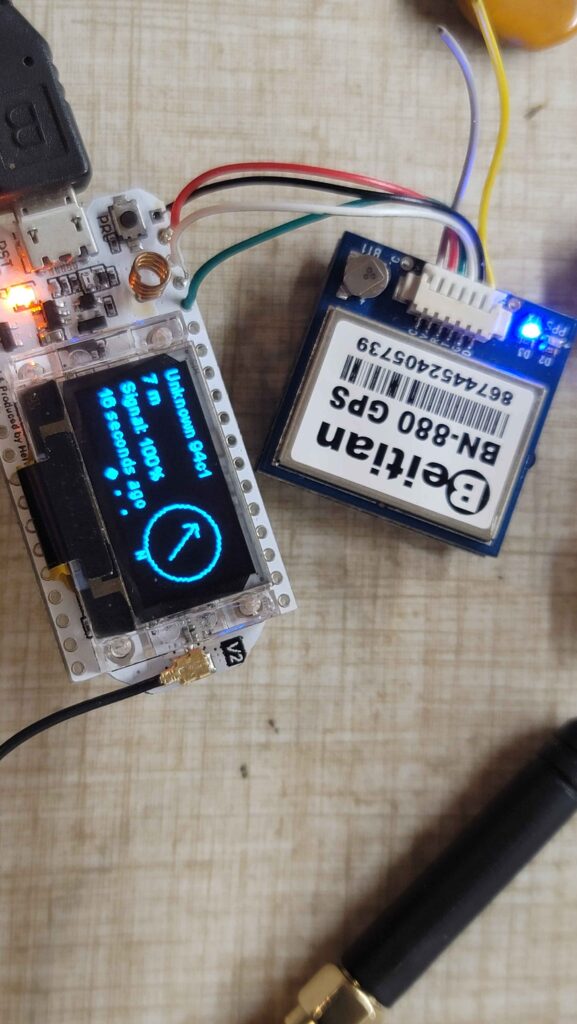
I added this GPS I had laying around to this radio. It was ridiculously easy. Just hooked up power, and pin 36/37. TX to RX and RX to TX.
It took about 10 minutes with decent soldering skills. Or bad skills like mine.
I was expecting some work in the Meshtastic code, but it works out of the box, plug n play. This is a widely used GPS module.
TTGO-BEAM
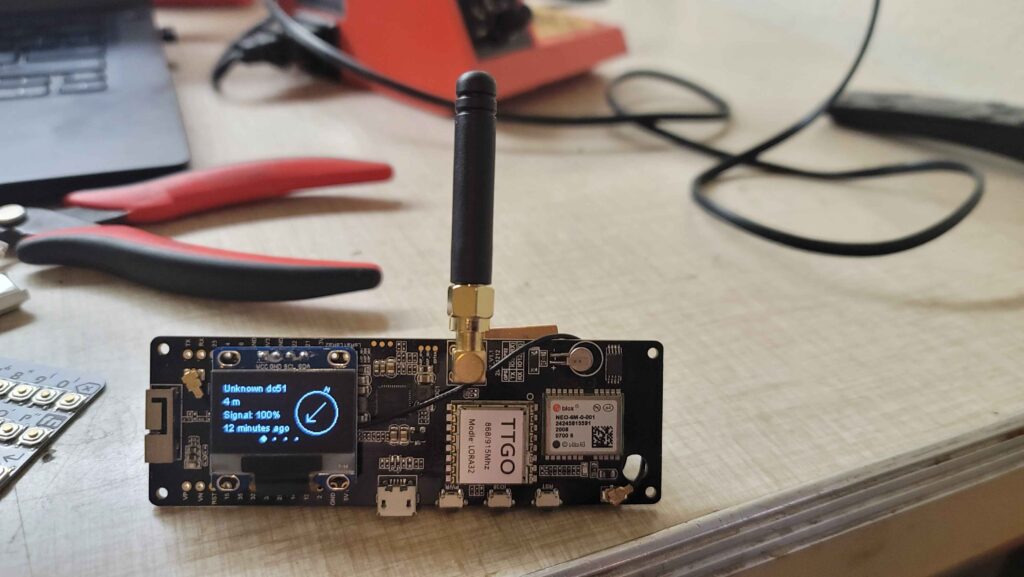
This device has a GPS, and battery mount on the back for an 18650 battery.
If you need to install Meshtastic on a device you might have laying around its not hard at all.
Once installed, and setup on a device (usually Android) it can start to send and receive on a mesh network.
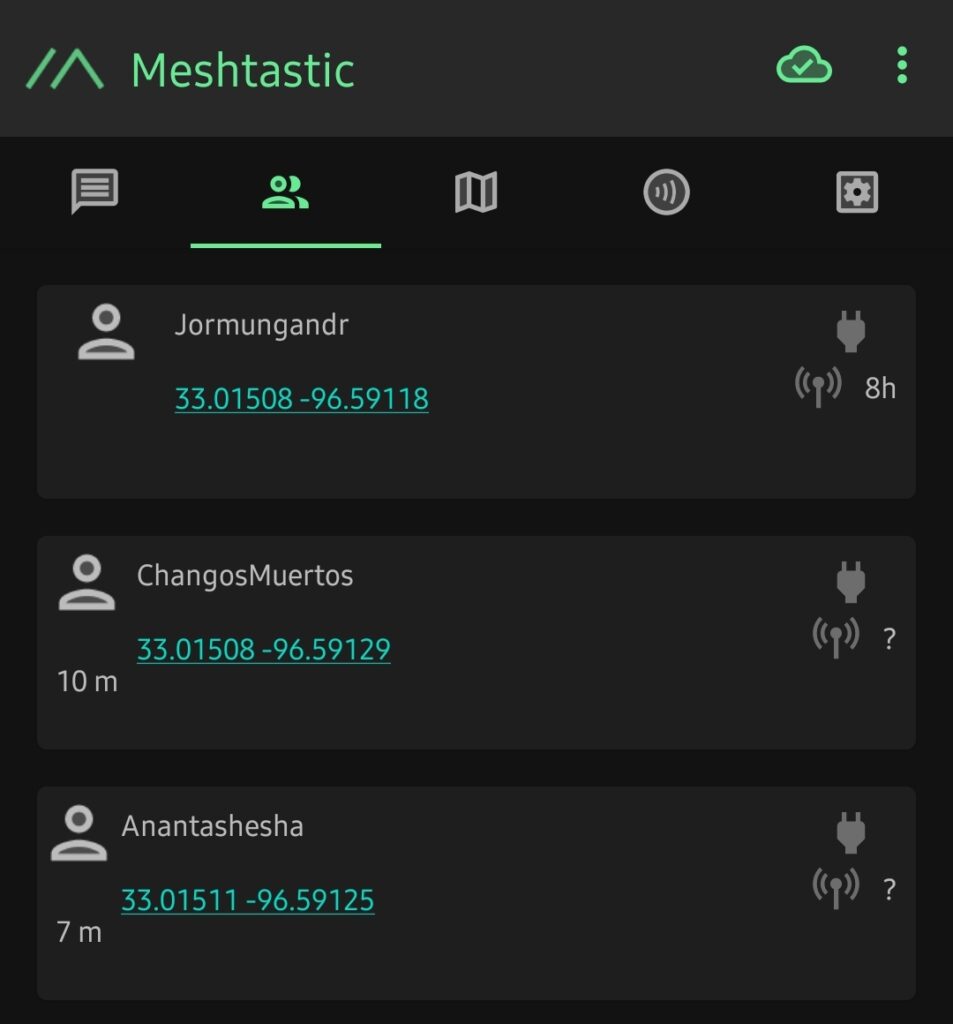
They defaults will put them all on the same channel. In order to change the settings I used Meshtastic-python
Using meshtastic CLI in Linux allows you to update the settings on the device much more easily. Using this you can set the name, wifi, channel, and a lot of other features you dont see in the GUI.
Tracking a target
Once you have paired a device to your phone/device via Bluetooth, Meshtastic will then start receiving signal on the LoRa board and relaying it to your phone. This will include the GPS coordinates of the device. Now you have a start. I personally use 3 devices, although 2 will work.
Now that you have one device reporting in, you simply need to ensure any new devices you have are setup the same. If so, they will start talking to the device you just setup. This is how a mesh network works; and is also the reason I recommend 3 devices.

So why 3? I have the device I use with my phone for ease of use; and I have another I use as a tracker. Well, what I didn’t mention is one device doesn’t have GPS. So with the meshtastic CLI you can put a permanent GPS on it since its stationary. Then there is a store,and forward plugin that helps with messaging on the network. I enable all those; and set it to never sleep. This makes a router of sorts, and a receiver for LoRa that is always awake. I use this device as a receiver, and put it up high for good signal.
There you have it, the devices will show up on the map in Meshtastic, using that in combination with the GPS location.
Up Next
Tracking data live and Use Cases with my dog Beau!

A post I didn’t want to make…but its important! (Please Read!)
But it needs to be done… if you have kids, or plan on having them in the future in the US. Also please watch, at least the first 30sec. That’s it… I can’t imagine a more heartless, profit mongering, inefficient, and unintelligent thing to happen in front of our eyes… If you are reading this, and you know me; you will know that I don’t participate in politics, or any social media drama. This is simply a problem we need to address.
With the resources at hand, and the knowledge that should be shared… There is no reason to allow this to continue. As a people, without regard to race, location, or any other factor. I have been near death on more than one occasion due to the limitation in place.
I will follow this article up, with more information, and my story of fighting for my life, and changing jobs, just to stay alive. I will share my “setup”, and “hacks”, to get your insurance to pay for the needed equipment. I will also go over the technology involved, and how you can use it safely, and securely. Here is an example of an OLD video showing the need; and although the technology exists… Insurance companies, and others have gone out of their way to deny access to the needed hardware at a reasonable prices.
Please share if you know anyone with Diabetes, especially if they have diabetic children. I would love to see responses to this article. I am hoping all that I have learned can be come easier to find out for people, than it was for me…
-MC
WHO DID WHAT WITH ROOT?!
When you are not sure who is using SUDO on a server, and you really need to know who keeps making that annoying change. You can install something to watch them, and maintain that software and related logs. Keep it setup in your package management system, and make sure it doesn’t have any patches.
OR
You could use the little-known (at least those I have asked in the field) modifications I will list below. They are two fold. One, you will enable to record who logs in and uses SUDO, and records their session. Much like many pieces of software out there today. The one catch to my method is simple. You already have the software installed, yup this has been a feature of SUDO since version 1.7.4p4. So nothing else to install, worry about, or maintain. It is also very easy to setup, see below:
/etc/sudoers modifcation:
All you need to do is to add 2 tags to all required sudoers entries.
*(where "su" specified, either with command or alias).
LOG_INPUT and LOG_OUTPUT
Example:
%admins ALL=(ALL) NOPASSWD: LOG_INPUT: LOG_OUTPUT: ALL

It will add the following default log dir structure to sudoers: Defaults iolog_dir=/var/log/sudo-io/%{user}
Note:
Output is logged to the directory specified by the iolog_dir option (/var/log/sudo-io by default) using a unique session ID that is included in the normal sudo log line, prefixed with TSID=. The iolog_file option may be used to control the format of the session ID. Output logs may be viewed with the sudoreplay(8) utility, which can also be used to list or search the available logs. Keeping in mind that if the user has a really long session you will be viewing it like a movie, it will replay as if he is sitting there typing. With this in mind, sudoreplay gives you the ability to play back at faster speeds. This makes it easier to find where things happened in a long recording.
So that is one good method to help find a culprit, but what if you are just looking at history of root? Can you tell me who ran what? Can you tell me when they ran the commands you see when you type ‘history’? By default, no. The next tidbit of info is very useful, and extremely easy to add to your machines. Simply add the following to your /etc/profile:
export HISTTIMEFORMAT="%m.%d.%y %T "
Yes, that is a space at the end. If you do not put that in there you will end up with it running together with the actual command typed in history. So your history should look like the example below:
1995 06.10.15 13:08:05 top
1996 06.10.15 13:08:05 clear
1997 06.10.15 13:08:05 df -h
1998 06.10.15 13:08:05 umount /media
1999 06.10.15 13:08:05 sudo umount /media
2000 06.10.15 13:08:05 sudo su –
2001 06.10.15 13:08:07 history
I hope this helps someone save some time, as it has me. Please feel free to share with others.
-M
Why is everyone so mad at Redhat about CentOS?
First, what is a Rolling Release, and why is everyone so mad about it?
Well Wikipedia defines a rolling release as follows:
Rolling release, rolling update, or continuous delivery, in software development, is the concept of frequently delivering updates to applications. This is in contrast to a standard or point release development model which uses software versions that must be reinstalled over the previous version. An example of this difference would be the multiple versions of Ubuntu Linux versus the single, constantly updated version of Arch Linux.
Well, now we know what it is… why is everyone so mad?
It is because a rolling release, even though it is constantly being fixed can be quite unstable. This is not a huge deal for applications running in a desktop environment, but in a real production environment it is not acceptable.
To give an example, if you were running an application in a production. A library underneath could get updated, and break your application without any notice. In fact, it is common practice for many enterprise applications to “holdback” a version of an application; or even host the install files in their own repository to ensure nothing malicious makes its way in.
So in short, and in my opinion, Red Hat bought CentOS a few years back as they were becoming the competition. As everyone feared then, they are essentially making it a non-enterprise product. This is likely due to the large chunk of the market they are loosing to Ubuntu. Which is well deserved in my opinion.
Hope this was informational… Have a good rest of your 2020!