Monthly Archives: August 2017

Jasper Image Updates[Update]

I have been quietly working on the installer and image.  However, there have been 2 OS updates since I started.  So I am refreshing all of my images with Raspbian Stretch.  I will be making it available soon.  Also, if anyone has a class 10, 4GB MicroSD they want to donate. I am trying to make the image as small as possible.  Please contact me directly for details.

The new Image will be based on Raspbian Lite as mentioned above, and will have the basic dependencies met.  It will also have newer versions of all the software pre-compiled to save you the hours of time it can take.

I am working on software to auto-configure most audio devices.  This is something I hope to include soon.  Please keep an eye out for the new links.

Thanks,

Matthew Curry

[UPDATE]

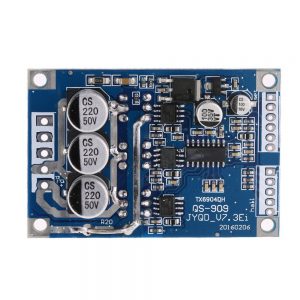
Thank you to TJUMP7 for the 4gb Card!  Small Image coming soon!  Keep an eye out for that and the installer….


[UPDATE] 01/24/2018 – After being out for a while for personal reasons, I am glad to say I am back. I will be working on the updates/releases soon.

Updates on Kill-Switch (E-Vehichle for son).

During my latest testing phase, there was an accident with the motor controller.  This has put a small speed bump in my little project.

However, this may be a blessing in disguise.  I wanted to put in my own motor controller before, but I was trying to do this build without purchasing much.  So, I was using the built-in controller within the old hover board housing.  This came with many obstacles; for one, the circuit was very sensitive to change.  If I wanted it to work; the LEDs and everything had to be perfect. Otherwise it would throw errors. Keeping in mind that I do not have any manual, documentation, etc on the hardware here.

Once I replace their motor controller with mine, it will be even better for my automation.  I actually do have RPI motor controller HATs; however nothing rated for 500w.  So I am going to be using the following per side. http://a.co/eHzWM2i

This will allow me to control the speed with the battery, and hub motors I already have. Just add a potentiometer per side, and were in business. Those pots will be controlled via very small servo.  This will allow the user to control them, but the servos will put them back to zero (stop) after use.  This also enables the control via RPI3, as I mentioned before.

On another note; I am considering using casters in the front since you will be able to steer via the controls.  Alternatively, I get one controller and use it as a throttle only.  This would work, but then I would have to have front steering.


Thanks for all the support,

Matt Curry

Handy One-Liners – Full Debian Update

This one is great for a “Full Update” on debian / ubuntu machines.

It calls the script without ever installing anything (assuming curl is installed).  Be sure to run as root, either with sudo or as root directly.

As you can see in the snippet; it uses a script that is remotely hosted (in a github gist).  This is great because you  can see exactly what it does by looking at the script.  It just calls system commands, so it can’t do anything malicious.  Just run sudo, then the above command and it will run the below script:

Another trick you can do with something like this, is copy it to  /usr/bin/fullupdate (as root of course), and ensure its executable “sudo chmod +x /usr/bin/fullupdate”.  Then you can call “sudo fullupdate”, from anywhere and use it when needed. Alternatively, you can use it on a cron to run on a schedule!  If you don’t want all the options, just download the script and change it for your liking.


Welcome to open source.

DIY Eclipse Glasses

Nothing Fancy here, but they work. (Use are your own risk)

First off, never look directly into the sun!  Always have the PROPER eye protection!

Supplies
1. Pen
2. Paper
3. Cereal box
4. Aluminum foil
5. Scissors

Yes, that’s it!

How to make an eclipse viewer yourself:
1. Put the cereal box on the piece of paper and trace the outline of the bottom of the box, creating a rectangle.
2. Cut out the rectangle.
3. Take two pieces of tape and make loops, then place them on both ends of the rectangle.
4. Take the piece of paper and place it inside the bottom of the cereal box tape-side down.
5. Close the cereal box up once the piece of paper is inside.
6. Create two holes in the top of the box, one on each side.
7. Cut the holes out with scissors — one will be for your eye, and the other will be covered by foil.
8. Tape the top of the box down revealing the two holes.

9. Take a piece of aluminum foil and cover one of the holes up (it doesn’t matter which one you choose.)
10. Take your pen, make a tiny hole in the middle of the aluminum foil.

And you’re done!

Got an Idea? Need Help? Raspberry PI prototyping!

Just another thing that I helping with lately.  If anyone need help with a new idea for a Raspberry PI, or IoT device message me.  I have been  through several POC’s (proof of concepts).

Keep in mind, if you are working on a new product; or sensitive information I keep all client info secret, and have no issues with an NDA.

  • Home Automation
  • Voice Recognition
  • Several TTS/STT Options
  • Custom Hardware
    • Integration with existing hardware
  • Custom Software
    • Custom Plugins/Adjustments
    • Coding
  • R&D on Subject Matter
    • Build
    • Test
    • Design
  • … and whatever else is needed …

Happy to just answer questions; or see what I can do to help.  Just contact me.

Building E-Vehicle/Robot for Son!

I am building a robot (named aptly: Kill Switch) from old parts I had laying around, and it is powered by hub motors from a ‘hover-board’.  The stats were pretty strong for small kids; so I am building a lot of safety into it.

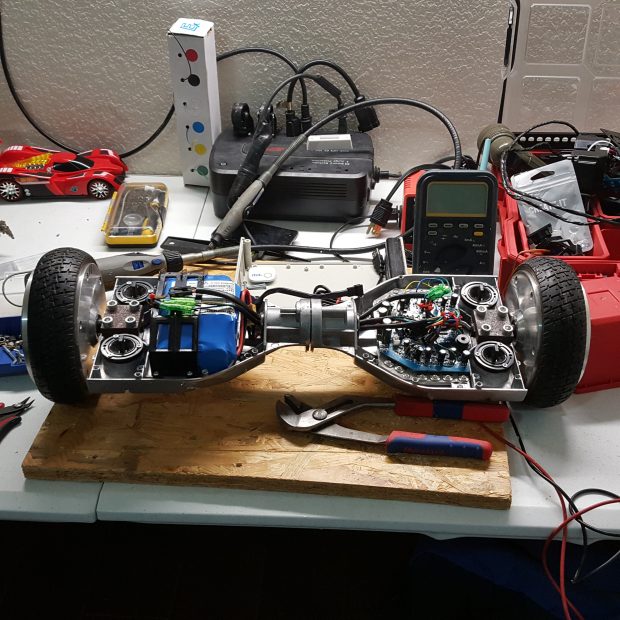
This will include software, and hardware measures to ‘take over’ the device, and even limit speed.  Eventually I will be able to return him back to a certain spot with playtime is over.  I hope to automated charging as well eventually.  There are a lot of features I have ready; however I am still building out the hardware.

This can be difficult to do and keep extremely safe.  So for starters I am testing it only; and I have 2 kill switches I am putting in to ensure safety.  One the person will have to keep his foot on constantly for the buggy to run.  The other is a simple quick kill switch.  (Eventually these will be automated).

The Device already has an RPI3 with a small motor-controller for future automation’s.  This will control other aspects of the vehicle via software.  Such as speed limitations, power usage, GPS, WIFI, BT.  I will also be using a pico router to establish a LAN around the device.  This is for media, as the vehicle will have speakers/screen to watch/host media on the LAN.

Hardware Safety Features:

  • Dash Kill Switch
  • Foot Kill Switch
  • Flip/Tilt Sensor
  • Lights
  • Front
  • Rear

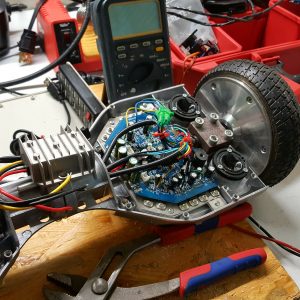
Once testing is completed, and it works; I will go through how I set it up.  However, this will be piece by piece as I do it.  I have even considered some youtube videos.  However, that will depend on my success in doing this on a budget.  I am also using completely reclaimed parts, minus a couple bolts I bought.  So its been free so far.

On that note, I have been building the chassis, but if anyone in the Dallas, TX area has an old go-cart frame that rolls/steers, I am looking.  I think it would make it a lot lighter.  Shoot me a message, info is on my contact me page.


MUCH More to come… Please keep an eye on the series…

-M

Setting up Raspberry PI 3 Wifi (Via CLI/BASH)

To all Raspberry PI Tinkerers…
I have had several people as for a how-to on setting up wifi on a Raspberry PI via command line.  It is actually quite easy.

Here is a quick tutorial I hope helps.


First, we need to open the file that controls what wifi we connect to.

sudo nano /etc/wpa_supplicant/wpa_supplicant.conf

This will open the file that controls what access points your RPI looks for.

Here is an example of how one should look (RPI3):

country=US
ctrl_interface=DIR=/var/run/wpa_supplicant GROUP=netdev
update_config=1
network={
        ssid="SSID_HERE"
        psk="KEY_HERE"
        key_mgmt=WPA-PSK
}

Now that this file has been updated; we will need to reboot to ensure everything comes back up correctly.
Ensure that your RPI is connected to wifi.

Simply type: ifconfig

Then it will show all the interfaces, the wireless is usually “WLAN0”, or something that starts with a “W”.
The ethernet will usually start with an “E”, for example “ETH0” is very common.