Category Archives: Matt_Curry

Lora + Meshtastic GPS Tracker

Tracking targets in the neighborhood with and without the internet! Cheap, and Easy!

LoRa (from “long range”) is a proprietary low-power wide-area network modulation technique.

In this project we will be using a mix of items to accomplish the goal at hand. That in no way means its the best way. In this case its more ease of setup, and use for the project at hand.

The software we will be using is call Meshtastic, this can be used for a few things; and can even be purchased pre-flashed on some LoRa devices.

Using Meshtastic, we can keep an eye on where our trackers are, and even send messages to them. Keep in mind that Meshtastic is usually used by an android phone as a means of communication when there is no internet or phone network. The LoRa device with Meshtastic communicates via Bluetooth with the android device. This allows for texting over LoRa via the application.

However, if the device has a GPS on it, it will also relay that information. Since these devices are ESP32 based they can go into a ‘deep sleep’ when not in use. This makes them very power friendly, and many of them run for days on a small battery.

In this example I am going to use the 2 different devices, one that I added a GPS added to manually.

Hardware Used

Heltec Wifi LoRa v2 + BN-880 GPS

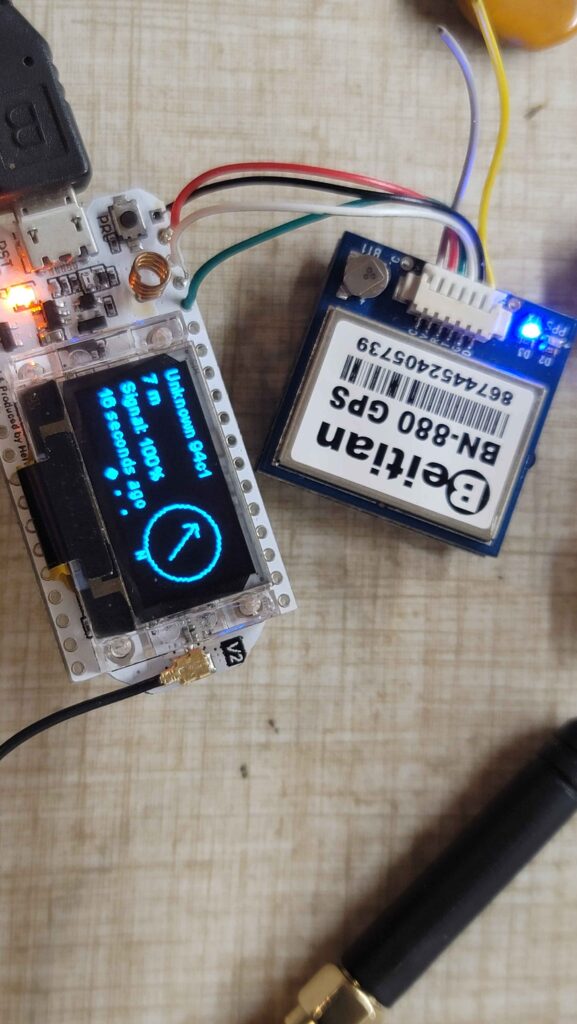
I added this GPS I had laying around to this radio. It was ridiculously easy. Just hooked up power, and pin 36/37. TX to RX and RX to TX.

It took about 10 minutes with decent soldering skills. Or bad skills like mine.

I was expecting some work in the Meshtastic code, but it works out of the box, plug n play. This is a widely used GPS module.

TTGO-BEAM

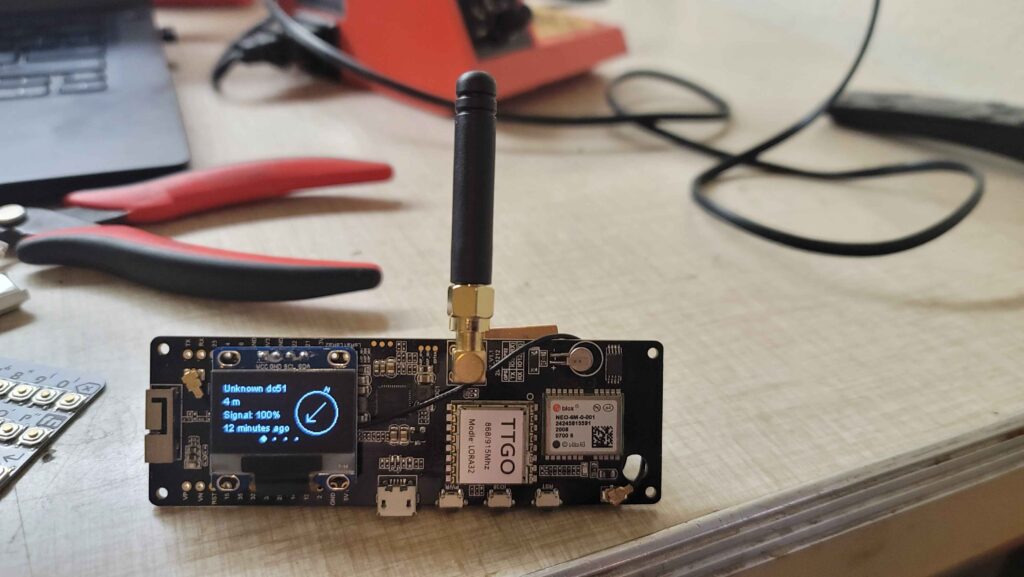
This device has a GPS, and battery mount on the back for an 18650 battery.

If you need to install Meshtastic on a device you might have laying around its not hard at all.

Once installed, and setup on a device (usually Android) it can start to send and receive on a mesh network.

They defaults will put them all on the same channel. In order to change the settings I used Meshtastic-python

Using meshtastic CLI in Linux allows you to update the settings on the device much more easily. Using this you can set the name, wifi, channel, and a lot of other features you dont see in the GUI.

Tracking a target

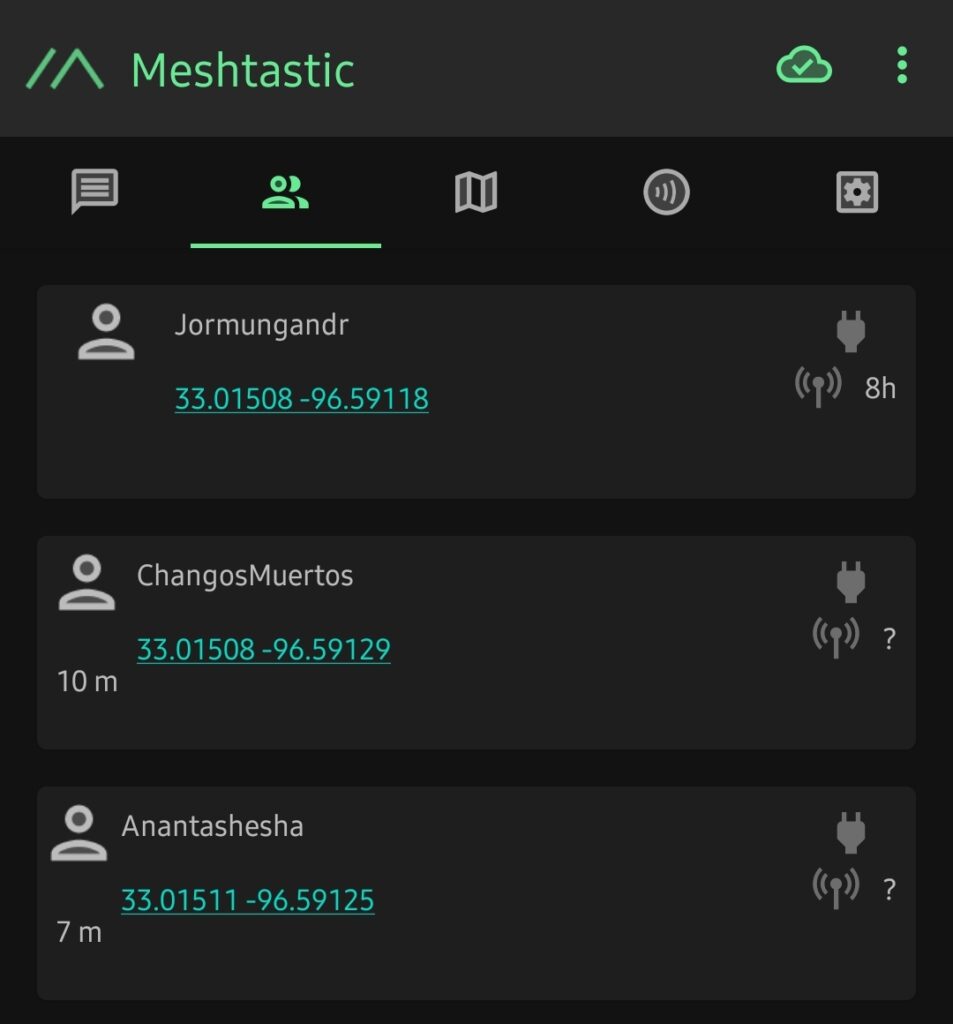
Once you have paired a device to your phone/device via Bluetooth, Meshtastic will then start receiving signal on the LoRa board and relaying it to your phone. This will include the GPS coordinates of the device. Now you have a start. I personally use 3 devices, although 2 will work.

Now that you have one device reporting in, you simply need to ensure any new devices you have are setup the same. If so, they will start talking to the device you just setup. This is how a mesh network works; and is also the reason I recommend 3 devices.

So why 3? I have the device I use with my phone for ease of use; and I have another I use as a tracker. Well, what I didn’t mention is one device doesn’t have GPS. So with the meshtastic CLI you can put a permanent GPS on it since its stationary. Then there is a store,and forward plugin that helps with messaging on the network. I enable all those; and set it to never sleep. This makes a router of sorts, and a receiver for LoRa that is always awake. I use this device as a receiver, and put it up high for good signal.

There you have it, the devices will show up on the map in Meshtastic, using that in combination with the GPS location.

Up Next

Tracking data live and Use Cases with my dog Beau!

WHO DID WHAT WITH ROOT?!

When you are not sure who is using SUDO on a server, and you really need to know who keeps making that annoying change.  You can install something to watch them, and maintain that software and related logs. Keep it setup in your package management system, and make sure it doesn’t have any patches.

OR

You could use the little-known (at least those I have asked in the field) modifications I will list below.  They are two fold.  One, you will enable to record who logs in and uses SUDO, and records their session. Much like many pieces of software out there today.  The one catch to my method is simple.  You already have the software installed, yup this has been a feature of SUDO since version 1.7.4p4.  So nothing else to install, worry about, or maintain.  It is also very easy to setup, see below:


/etc/sudoers modifcation:
All you need to do is to add 2 tags to all required sudoers entries.
*(where "su" specified, either with command or alias). 
LOG_INPUT and LOG_OUTPUT
Example: 
%admins ALL=(ALL) NOPASSWD: LOG_INPUT: LOG_OUTPUT: ALL

It will add the following default log dir structure to sudoers: Defaults iolog_dir=/var/log/sudo-io/%{user}
Note:
Output is logged to the directory specified by the iolog_dir option (/var/log/sudo-io by default) using a unique session ID that is included in the normal sudo log line, prefixed with TSID=.  The iolog_file option may be used to control the format of the session ID.  Output logs may be viewed with the
sudoreplay(8) utility, which can also be used to list or search the available logs.   Keeping in mind that if the user has a really long session you will be viewing it like a movie, it will replay as if he is sitting there typing.  With this in mind, sudoreplay gives you the ability to play back at faster speeds.  This makes it easier to find where things happened in a long recording.

So that is one good method to help find a culprit, but what if you are just looking at history of root?  Can you tell me who ran what? Can you tell me when they ran the commands you see when you type ‘history’?  By default, no.  The next tidbit of info is very useful, and extremely easy to add to your machines.  Simply add the following to your /etc/profile:

export HISTTIMEFORMAT="%m.%d.%y %T "

Yes, that is a space at the end.  If you do not put that in there you will end up with it running together with the actual command typed in history.  So your history should look like the example below:

1995 06.10.15 13:08:05 top
1996 06.10.15 13:08:05 clear
1997 06.10.15 13:08:05 df -h
1998 06.10.15 13:08:05 umount /media
1999 06.10.15 13:08:05 sudo umount /media
2000 06.10.15 13:08:05 sudo su –
2001 06.10.15 13:08:07 history

I hope this helps someone save some time, as it has me.  Please feel free to share with others.

-M


Linux Gaming just got way better!

Since the release of ProtonDB, there have been over 2500 games added to Linux!

What is Proton?

Proton is a new tool released by Valve Software that has been integrated with Steam Play to make playing Windows games on Linux as simple as hitting the Play button within Steam. Underneath the hood, Proton comprises other popular tools like Wine and DXVK among others that a gamer would otherwise have to install and maintain themselves. This greatly eases the burden for users to switch to Linux without having to learn the underlying systems or losing access to a large part of their library of games. Proton is still in its infancy so support is inconsistent, but regularly improving.

ProtonDB is used to collaborate on performance on different hardware/software configurations. Allowing the community to work together to get the games working.

Setting Up Proton in STEAM – Tested Ubuntu 18.10

Links on Site

Due to the purchase of Github from Microsoft, I have removed my account and all repositories.  This will also affect a few posts I have made here.  The links used to embed some small snippets (aka GISTs) of code will no longer work.  As time is available I will start fixing them manually.  Until then I thank you for your patience.


Thanks,
Matthew Curry

How to use a PS1 in Linux/MAC

Here are the PS1‘s I use for my daily driver.  Feel free to take them and change them up.

I use different colors, so one doesn’t accidentally login or run something as root (which is in red, users are yellow).

To use these, simply copy and paste them into either the root user; or regular user’s .bashrc.

Alternatively you can add them to /etc/profile to make them enforced system wide. 

For MAC, it is the same; however the PS1 is a little different. See below.


Root


User

Site Updates

Just a heads up to all out there that care.

MattCurry.Com was down for a bit, while I installed the SSL Certificate, and updated my site.

Again, thank you to all the regular users.  Please don’t forget to subscribe to my RSS for updates.

Sincerely,
Matthew Curry


Using Nano with Markdown in Linux

Fan of nano?  Like having pretty colors to see where you messed up? Of course we do!  Much like many of us, I use nano.  Its quick, easy, and readily available.  However, I like to see the highlighting of my language.  As many of you know, there are “nanorc” files, that will tell nano how to handle language highlight.

They are usually located in  /usr/share/nano/ (at least in ubuntu); and you can make your own under your home directory with a .nanorc file.  I can post about that later…

For now let get markdown working in nano!

You will need to create a file called markdown.nanorc by doing the following:

 sudo touch /usr/share/nano/markdown.nanorc

Now that the file is created, we just need to populate it with the following below text, in a pastebin for your convenience.  Just copy that text, and paste it into the aformentioned file. Once a new session is started, you will be able to start using markdown.

https://pastebin.com/raw/tHkBqdef

Just a little note as well; if you have a need for another language, you can follow the same instructions with their pre-reated files.  Take a look here, to see other nanorc files.  Also, nano has just been updated after a very long while, please take a look at the new support when you can.


Kill Switch Pictures/Update

Hello All,

For those following along, I have moved Kill Switch, my sons e-vehicle project. To a permanent page.  I have also added a gallery for the work as I go.  Keep an eye…

You can also subscribe to my RSS if you like.

Thanks,
-M


P.S.

Thanks to TJUMP7 for the donated 4gb SD card, and help with the motor controllers!  I can’t wait to get all the parts and get it going!

Jasper Image Updates[Update]

I have been quietly working on the installer and image.  However, there have been 2 OS updates since I started.  So I am refreshing all of my images with Raspbian Stretch.  I will be making it available soon.  Also, if anyone has a class 10, 4GB MicroSD they want to donate. I am trying to make the image as small as possible.  Please contact me directly for details.

The new Image will be based on Raspbian Lite as mentioned above, and will have the basic dependencies met.  It will also have newer versions of all the software pre-compiled to save you the hours of time it can take.

I am working on software to auto-configure most audio devices.  This is something I hope to include soon.  Please keep an eye out for the new links.

Thanks,

Matthew Curry

[UPDATE]

Thank you to TJUMP7 for the 4gb Card!  Small Image coming soon!  Keep an eye out for that and the installer….


[UPDATE] 01/24/2018 – After being out for a while for personal reasons, I am glad to say I am back. I will be working on the updates/releases soon.

Updates on Kill-Switch (E-Vehichle for son).

During my latest testing phase, there was an accident with the motor controller.  This has put a small speed bump in my little project.

However, this may be a blessing in disguise.  I wanted to put in my own motor controller before, but I was trying to do this build without purchasing much.  So, I was using the built-in controller within the old hover board housing.  This came with many obstacles; for one, the circuit was very sensitive to change.  If I wanted it to work; the LEDs and everything had to be perfect. Otherwise it would throw errors. Keeping in mind that I do not have any manual, documentation, etc on the hardware here.

Once I replace their motor controller with mine, it will be even better for my automation.  I actually do have RPI motor controller HATs; however nothing rated for 500w.  So I am going to be using the following per side. http://a.co/eHzWM2i

This will allow me to control the speed with the battery, and hub motors I already have. Just add a potentiometer per side, and were in business. Those pots will be controlled via very small servo.  This will allow the user to control them, but the servos will put them back to zero (stop) after use.  This also enables the control via RPI3, as I mentioned before.

On another note; I am considering using casters in the front since you will be able to steer via the controls.  Alternatively, I get one controller and use it as a throttle only.  This would work, but then I would have to have front steering.


Thanks for all the support,

Matt Curry