Category Archives: Howto

Auto Added by WPeMatico

Jasper Image v1.5 Released

Major Updates

NOTE:  Be sure to do a “git pull” in the “Jasper-RPI-Tools” directory to get the updated scripts.

  • Installed Home-Assistant.io
    • Script to enable Home-Assistant.io Daemon
      • It is located /home/pi/Jasper-RPI-Tools/enable-hass-service.sh
    • Config under /home/hass/.homeassistant
    • Installed in Virtual Environment
    • Installed under the “hass” user.
  • Removed clutter from rc.local
    • Was causing harmless error at boot.
  • Installed needed dependencies for the development branch
    • libmad0 * libmad0-dev
  • Created/Enabled Service for jasper “jasper-daemon”
  • Created/Disable Service for Home-Assistant.io (user needs to enable)
  • Created Script to download a specified version of Jasper/Jasper-dev
    • It is located /home/pi/Jasper-RPI-Tools/installers/jasper-repo-installer.sh
      • You can pick what branch you would like to use at clone-time
  • Ensure phonetisaurus pre-compiled/installed
  • Removed Erroneous cron entries
  • Updated the OS and all related pkgs

Jasper Client Links

These are several links I have compiled, and/or created in the last few months. They can help you get Jasper going. I am also working on a full how-to for both RPI2 and RPI3.

  • Jasper-Support-Forums
    • Support forums, I help run these if you have any questions. Contact Me.
  • SLACK SIGN UP
    • Chat room for helping with Jasper
  • Jasper-Client
    • Official Jasper-Client
  • Jasper-RPI-Tools:
    • Set of tools I created in helping setup Jasper/RPI. They are a work in progress, so be sure to do a ‘git pull’ often.
  • RPI-Jasper-Dependencies:
    • Set of pre-compiled dependencies, that would normally take hours to compile. Tested on RPI2/3. Usually used for a non-Jasper image; as the images I created have them all installed.
  • ALSA Setup Wiki
    • Help with ‘.asoundrc’, and setting your default audio device
    • Usually the most common road block.
  • Home-Assistant.io: Home automation for the RPI, works very well. Working on integration on the same RPI; however it has dependency conflicts. Testing in pyenv soon…
  • How TO: Burning SD Card

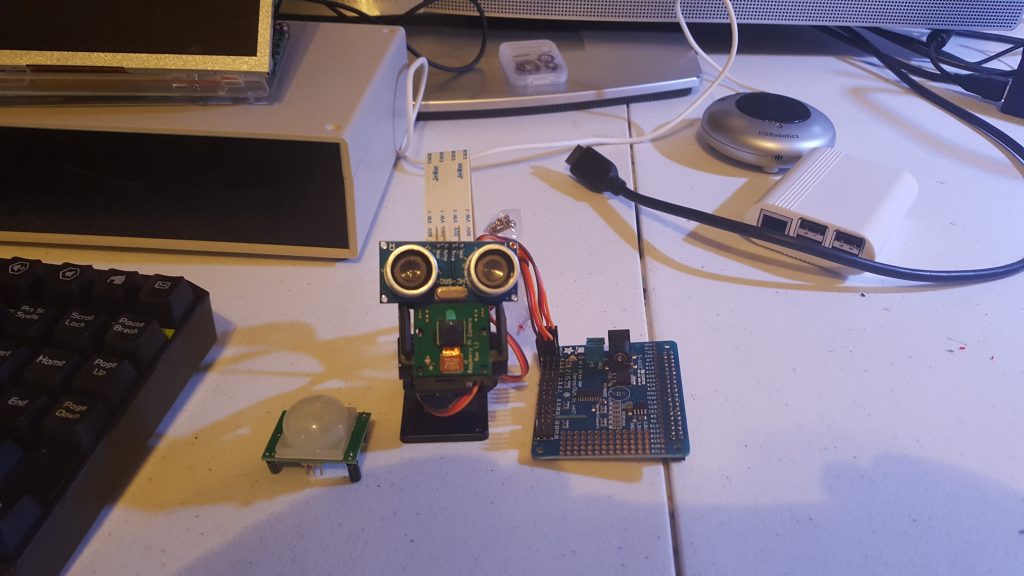
NAOMI gets an Upgrade… A head…

NAOMI-HEAD


Hardware Shown:

  • High Resolution Raspberry PI Camera
    • Eventually I would like to try stereoscopic vision
  • PIR Motion Sensor
    • Used to ‘Wake’ NAOMI to motion in the room.
  • UltraSonic Range Sensor
    • She will track any motion
    • Once an Object/Person/Face is being tracked the Range Sensor will take measurement readings.
  • PWM HAT
    • Used to remove ‘Jitter’, and allow for other Servos
    • May try an “Arm”
  • Server Mount Allowing Pan/Tilt

Reason #… I’ve lost count…not to use Microsoft.

image

Welcome all windows, and samba users. Please read badlock.org for why poor decisions have led to this day.

There is a known vulnerability with samba, please read the site listed. If time permits I will update this article with better info.  However, if you are running Samba the shame on you… especially the old version. I have not “had to run samba”, for anything in several years now.

Please read my article on using AFPd in linux to use it as a time machine  backup.  Works great! Or my preference is NFS on a LAN. 

Either way, I  hope this helps a few people. Please share the article if it helped.  There is a patch with CVE on the way according to their site.

Sincerely,
M

Be Careful with LetsEncrypt!


I must say, like a lot of people I love the idea of a free SSL Certificate.  So I thought this would be great for my site.  So I downloaded the LetsEncrypt package on to an Ubuntu 15.10 box.  The server was running Apache2, and was pretty much stock.  When I applied the cert to the site, it was super easy.  I was very impressed with the ‘–apache’ option.  I then updated my URLs in WordPress to HTTPS.  That’s it I was up and running in a few min.  I was pretty happy at this point.

Then, I realized it broke all of the other services I had on the machine that were public facing.  I had several.  Even ones with their own certs were breaking.  So I decided to remove it…. After removing it from Apache completely I noticed an issue.  All of my users that had been to the site; were getting redirected still.  Somehow it is keeping the redirct with the cert/data that is installed when the cert is installed from visiting the site.

Long story short, I had many people that thought my site was down.  I even moved servers; and it still happened. I tried clearing browser cache, DNS Cache on my MAC, from another IP. Finally after a reinstall (probably not needed, but quicker); I was able to actually load my site without the redirect.  I am sure there is something here I am not seeing; but to be honest I didn’t feel like spending all my time dealing with browser settings.

If anyone would like to let me know how they get around this I would like to know.

I hope this helps those who are thinking of trying out LetsEncrypt.  I am not saying its a bad product; or idea.  I love the install and the idea of it.  However, the practical implementation is not there yet.  For those reading this keep in mind that it is still in Beta as of this article.  So this might eventually go away.

P.S. – To those on the LetsEncrypt project, I appreciate all the work; and I hope you take this criticism positively. A good uninstall path is needed before I think this will go mainstream on monolithic boxes.  Maybe its ok with a 12 factor applications.

Sincerely,

Matthew Curry

NAOMI Updated Pics

Here is the latest picture I have of the ‘Semi-Portable’ version of NAOMI.

This includes the following:

  • 30AH Battery @ 2.2a (tested)
    • 35AH LiON Cells “Quick Drain”
  • Touch Screen 7″
    • Mounted Externally in own case
      • Not Permanent, built for bench
  • RPI2
  • 1TB USB 3.0 Hard Drive
  • Bluetooth Dongle
    • Not Shown
  • Powered USB Hub
    • Replaced/Rebuilt for one with switched ports
  • Logitech C170 USB Camera/Mic

Projects Page Added!

As requested, I have created a place for my projects on my site.  Please feel free to follow me as I work through them.  They are not projects that I am taking on professionally. They are completely for fun, and with no expectation or time limits.  That being said, I am a huge supporter of open source.

So in that spirit, I will be posting all functional code when I feel its ready to be used.  I am always open to ideas/suggestions.  Feel free to contact me via my Contacts page any time.

Quick Tip of the Day.

Not that I have them daily, but I might if I get a good response.

Have you ever tried logging into an SSH server, and get a weird error:

/.ssh/config: line 22: Bad configuration option: 342200202

This is a very simple issue but it can be a huge PITA if you can’t fix it quickly.  This is especially true for those of us that have to use an enormous amount of keys in our daily lives.  I know, I have a fairly simple config for SSH, but I still ran into this issue when I pasted a block of text in  ~/.ssh/config.  I opened the file with VI, and NANO. I was only able to get it to work when I removed the spaces before each line it complained about.  I then just put them back as normal, and saved.

It turns out, that copying from another place can have the spaces not interpreted properly. They are tabbed indentations actually.  Once manually removed they are replaced by a normal “space” in the code and it should work properly.  I hope this saves some time for some people.


Thanks,
Matthew D. Curry


Time Machine Backup with Ubuntu 15.x and OSX 10.7+

In the Older versions of this how-to, you will see people use the method shown just below.  Obviously that no longer works.  I will walk you through setting up TimeMachine via AFP over your LAN.  This is using an Ubuntu 15.04 machine; but since all the packages are common and in the base repos; I don’t see there being a problem getting it to work on any distro.

 OLD METHOD:
defaults write com.apple.systempreferences TMShowUnsupportedNetworkVolumes 1
NOTE: Any OSX after 10.6 Lion, will have to use the method demonstrated here.


Step 1: Install Netatalk

Install the following packages:

sudo apt-get install netatalk libc6-dev avahi-daemon libnss-mdns

Step 2: Configure /etc/nsswitch.conf

Once those packages are installed, we have to adjust 4 configuration files:

sudo nano /etc/nsswitch.conf

Locate the following:

hosts:          files mdns4_minimal [NOTFOUND=return] dns mdns4

Add mdns  as below:

hosts:          files mdns4_minimal [NOTFOUND=return] dns mdns4 mdns

Step 3: /etc/avahi/services/afpd.service

sudo nano /etc/avahi/services/afpd.service

Paste the following:

<?xml version="1.0" standalone='no'?><!--*-nxml-*-->
<!DOCTYPE service-group SYSTEM "avahi-service.dtd">
<service-group>
    <name replace-wildcards="yes">%h</name>
    <service>
        <type>_afpovertcp._tcp</type>
        <port>548</port>
    </service>
    <service>
        <type>_device-info._tcp</type>
        <port>0</port>
        <txt-record>model=TimeCapsule</txt-record>
    </service>
</service-group>

Step 4: /etc/netatalk/AppleVolumes.default

Now we setup the share:

sudo nano /etc/netatalk/AppleVolumes.default

At the bottom the section that reads:

# The line below sets some DEFAULT, starting with Netatalk 2.1.
:DEFAULT: options:upriv,usedots

# By default all users have access to their home directories.
~/                      "Home Directory"

# End of File

Change the path “~/”  to your share directory.

IMPORTANT:  Don’t forget to add ‘tm’ to options:upriv,usedots
As seen below:

# The line below sets some DEFAULT, starting with Netatalk 2.1.
:DEFAULT: cnidscheme:dbd options:upriv,usedots,tm

# By default all users have access to their home directories.
/path/to/share                       "Time Capsule"

# End of File

Step 5: /etc/default/netatalk

Now, we need to adjust netatalk settings.

sudo nano /etc/default/netatalk

Locate the following section:

#### Set which legacy daemons to run.
#### If you need AppleTalk, run atalkd.
#### papd, timelord and a2boot are dependent upon atalkd.
ATALKD_RUN=no
PAPD_RUN=no
TIMELORD_RUN=no
A2BOOT_RUN=no

Update it to reflect the following:

#### Set which legacy daemons to run.
#### If you need AppleTalk, run atalkd.
#### papd, timelord and a2boot are dependent upon atalkd.
ATALKD_RUN=no
PAPD_RUN=no
CNID_METAD_RUN=yes
AFPD_RUN=yes
TIMELORD_RUN=no
A2BOOT_RUN=no

Once all is completed, and all the services have been restarted on the Ubuntu server.  The drive should show up under “Select Disk” under “Time Machine Preferences”.  If you have an old one, you may have to remove it.  Once selected you can use it as if it were physically plugged in.
 

*TIP – Use a wired connection only, and a gigE network will help immensely.  I do not recommend WiFi .

Search entire server for Q4 2015 obfuscated PHP malware of unknown origin.

This is just a snippet I have used before to identify some malicious code on web servers.  This will not work on everything; but it will give you a way to find suspect files.  It is easy to cron in a script with others to make a nice daily report if you have those concerns.

#!/bin/bash
# Malware Search Script
# 11/1/15 – Matthew D. Curry
# Matt@MattCurry.com

echo “Search entire server for Q4 2015 obfuscated PHP malware of unknown origin.”

find / -name *.php -exec grep -Hn .1.=…….0.=…….3.=…….2.=…….5.= {} ;


Hope this helps, enjoy.