Category Archives: BASH Shell

Auto Added by WPeMatico

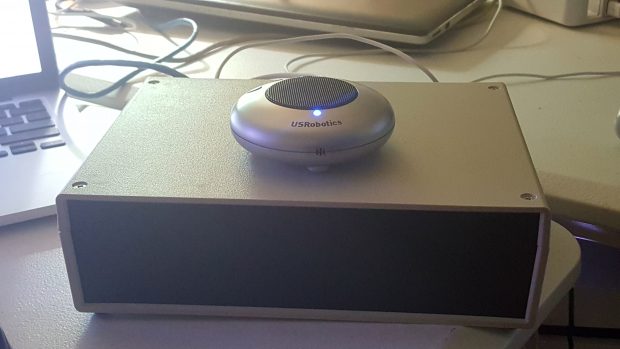
Pre-Built Jasper Kits, Ready to go out of the box!

These kits will arrive and be ready to use the moment you power them up. They will be customized to the user, and an image will be provided so they can restore any time they like.

They will include the following:

  • RPI3 B+
  • 32GB Class 10 SD Card
  • US Robotics 9610 [USB Speaker/Mic]
  • Customized/Installed/Setup of Jasper by me personally
    • Install of Jasper and all dependencies
    • STT Setup
    • TTS Setup
  • Testing
    • Running overnight
    • With your settings if you wish
  • Copy of your personalized image for backup
    • In case you wish to restore to a “Known Good” state
  • Updates
    • Such as customized integrations and modules provided by me.
    • Updated Installer / Setup script COMING SOON.


If you are interested in one of these kits, feel free to contact me or start the process by purchasing one below:


New Community TTS Server! – Thanks Mycroft.ai!

It has been a little while; but the guys and gals at Mycroft.ai helped us (The Jasper Project) with a donated TTS (Text to Speech) server.  This has helped many of our users to get their projects working virtually out of the box.  Keep in mind Mycroft.ai does almost the same thing. We would almost be a competitor.  However, I do not see it that way.  We are open source and here to help each other out.


Thank you again to the guys at Mycroft.ai!

To those not familiar with them; here is a link to their Indigogo campaign.

Be Careful with LetsEncrypt!


I must say, like a lot of people I love the idea of a free SSL Certificate.  So I thought this would be great for my site.  So I downloaded the LetsEncrypt package on to an Ubuntu 15.10 box.  The server was running Apache2, and was pretty much stock.  When I applied the cert to the site, it was super easy.  I was very impressed with the ‘–apache’ option.  I then updated my URLs in WordPress to HTTPS.  That’s it I was up and running in a few min.  I was pretty happy at this point.

Then, I realized it broke all of the other services I had on the machine that were public facing.  I had several.  Even ones with their own certs were breaking.  So I decided to remove it…. After removing it from Apache completely I noticed an issue.  All of my users that had been to the site; were getting redirected still.  Somehow it is keeping the redirct with the cert/data that is installed when the cert is installed from visiting the site.

Long story short, I had many people that thought my site was down.  I even moved servers; and it still happened. I tried clearing browser cache, DNS Cache on my MAC, from another IP. Finally after a reinstall (probably not needed, but quicker); I was able to actually load my site without the redirect.  I am sure there is something here I am not seeing; but to be honest I didn’t feel like spending all my time dealing with browser settings.

If anyone would like to let me know how they get around this I would like to know.

I hope this helps those who are thinking of trying out LetsEncrypt.  I am not saying its a bad product; or idea.  I love the install and the idea of it.  However, the practical implementation is not there yet.  For those reading this keep in mind that it is still in Beta as of this article.  So this might eventually go away.

P.S. – To those on the LetsEncrypt project, I appreciate all the work; and I hope you take this criticism positively. A good uninstall path is needed before I think this will go mainstream on monolithic boxes.  Maybe its ok with a 12 factor applications.

Sincerely,

Matthew Curry

NAOMI Updated Pics

Here is the latest picture I have of the ‘Semi-Portable’ version of NAOMI.

This includes the following:

  • 30AH Battery @ 2.2a (tested)
    • 35AH LiON Cells “Quick Drain”
  • Touch Screen 7″
    • Mounted Externally in own case
      • Not Permanent, built for bench
  • RPI2
  • 1TB USB 3.0 Hard Drive
  • Bluetooth Dongle
    • Not Shown
  • Powered USB Hub
    • Replaced/Rebuilt for one with switched ports
  • Logitech C170 USB Camera/Mic

Quick Tip of the Day.

Not that I have them daily, but I might if I get a good response.

Have you ever tried logging into an SSH server, and get a weird error:

/.ssh/config: line 22: Bad configuration option: 342200202

This is a very simple issue but it can be a huge PITA if you can’t fix it quickly.  This is especially true for those of us that have to use an enormous amount of keys in our daily lives.  I know, I have a fairly simple config for SSH, but I still ran into this issue when I pasted a block of text in  ~/.ssh/config.  I opened the file with VI, and NANO. I was only able to get it to work when I removed the spaces before each line it complained about.  I then just put them back as normal, and saved.

It turns out, that copying from another place can have the spaces not interpreted properly. They are tabbed indentations actually.  Once manually removed they are replaced by a normal “space” in the code and it should work properly.  I hope this saves some time for some people.


Thanks,
Matthew D. Curry


Time Machine Backup with Ubuntu 15.x and OSX 10.7+

In the Older versions of this how-to, you will see people use the method shown just below.  Obviously that no longer works.  I will walk you through setting up TimeMachine via AFP over your LAN.  This is using an Ubuntu 15.04 machine; but since all the packages are common and in the base repos; I don’t see there being a problem getting it to work on any distro.

 OLD METHOD:
defaults write com.apple.systempreferences TMShowUnsupportedNetworkVolumes 1
NOTE: Any OSX after 10.6 Lion, will have to use the method demonstrated here.


Step 1: Install Netatalk

Install the following packages:

sudo apt-get install netatalk libc6-dev avahi-daemon libnss-mdns

Step 2: Configure /etc/nsswitch.conf

Once those packages are installed, we have to adjust 4 configuration files:

sudo nano /etc/nsswitch.conf

Locate the following:

hosts:          files mdns4_minimal [NOTFOUND=return] dns mdns4

Add mdns  as below:

hosts:          files mdns4_minimal [NOTFOUND=return] dns mdns4 mdns

Step 3: /etc/avahi/services/afpd.service

sudo nano /etc/avahi/services/afpd.service

Paste the following:

<?xml version="1.0" standalone='no'?><!--*-nxml-*-->
<!DOCTYPE service-group SYSTEM "avahi-service.dtd">
<service-group>
    <name replace-wildcards="yes">%h</name>
    <service>
        <type>_afpovertcp._tcp</type>
        <port>548</port>
    </service>
    <service>
        <type>_device-info._tcp</type>
        <port>0</port>
        <txt-record>model=TimeCapsule</txt-record>
    </service>
</service-group>

Step 4: /etc/netatalk/AppleVolumes.default

Now we setup the share:

sudo nano /etc/netatalk/AppleVolumes.default

At the bottom the section that reads:

# The line below sets some DEFAULT, starting with Netatalk 2.1.
:DEFAULT: options:upriv,usedots

# By default all users have access to their home directories.
~/                      "Home Directory"

# End of File

Change the path “~/”  to your share directory.

IMPORTANT:  Don’t forget to add ‘tm’ to options:upriv,usedots
As seen below:

# The line below sets some DEFAULT, starting with Netatalk 2.1.
:DEFAULT: cnidscheme:dbd options:upriv,usedots,tm

# By default all users have access to their home directories.
/path/to/share                       "Time Capsule"

# End of File

Step 5: /etc/default/netatalk

Now, we need to adjust netatalk settings.

sudo nano /etc/default/netatalk

Locate the following section:

#### Set which legacy daemons to run.
#### If you need AppleTalk, run atalkd.
#### papd, timelord and a2boot are dependent upon atalkd.
ATALKD_RUN=no
PAPD_RUN=no
TIMELORD_RUN=no
A2BOOT_RUN=no

Update it to reflect the following:

#### Set which legacy daemons to run.
#### If you need AppleTalk, run atalkd.
#### papd, timelord and a2boot are dependent upon atalkd.
ATALKD_RUN=no
PAPD_RUN=no
CNID_METAD_RUN=yes
AFPD_RUN=yes
TIMELORD_RUN=no
A2BOOT_RUN=no

Once all is completed, and all the services have been restarted on the Ubuntu server.  The drive should show up under “Select Disk” under “Time Machine Preferences”.  If you have an old one, you may have to remove it.  Once selected you can use it as if it were physically plugged in.
 

*TIP – Use a wired connection only, and a gigE network will help immensely.  I do not recommend WiFi .

TCPDUMP with Date for Wireshark

Just another handy snippet:

It will date the output, and also put it in a handy pcap for Wireshark.

tcpdump -i eth1 -s0 -v -w /tmp/capture_`date +%d_%m_%Y__%H_%I_%S`.pcap

*Note: Should work on all Linux distros (make sure to have the right network interface selected, Ex: eth1); it might have to be slightly modified for Mac. Windows can go DIAF.


Search entire server for Q4 2015 obfuscated PHP malware of unknown origin.

This is just a snippet I have used before to identify some malicious code on web servers.  This will not work on everything; but it will give you a way to find suspect files.  It is easy to cron in a script with others to make a nice daily report if you have those concerns.

#!/bin/bash
# Malware Search Script
# 11/1/15 – Matthew D. Curry
# Matt@MattCurry.com

echo “Search entire server for Q4 2015 obfuscated PHP malware of unknown origin.”

find / -name *.php -exec grep -Hn .1.=…….0.=…….3.=…….2.=…….5.= {} ;


Hope this helps, enjoy.

Remove Spaces (or any character) from File Names in Linux

This is actually a pretty common thing to run into in a Linux file system.  It is especially prevalent in the files that are moved from another operating system (Usually Windows).  So if you get files that need to have a space or a character removed, the below snipped is a very simple, and handy way to fix this issue.

└─(11:26:40)-(~/Example)->ls
file 1.txt
file – 2.txt

So, from here we want to rename the file “file 1.txt” to “file_1.txt”.  This would be done as follows:

rename ‘s/ /_/g’ file 1.txt

This will remove any spaces in the file-name listed.  If you want to do all the files in a directory:

rename ‘s/ /_/g’ *

Here is an example output if we run it on all the files in the directory (as seen above):

└─(11:33:59)-(~/Example)->ls
file_1.txt
file_-_2.txt


Note:  If you are new to Linux; and you haven’t heard of the “sed” command, that is the syntax used in the command.  If you get comfortable with this, then you can easily learn sed, which is a great tool to have on the command line.